招聘网站做精准 置顶百度搜索引擎优化的推广计划
飞书开发学习笔记(五)-Python快速开发网页应用
一.下载示例代码
首先进入飞书开放平台: https://open.feishu.cn/app
凭证与基础信息 页面,在 应用凭证 中获取 App ID 和 App Secret 值。
教程和示例代码位置:https://open.feishu.cn/document/home/integrating-web-apps-in-5-minutes/create-app-and-configuration
共分为四步,其中示例代码在这个位置: 示例代码
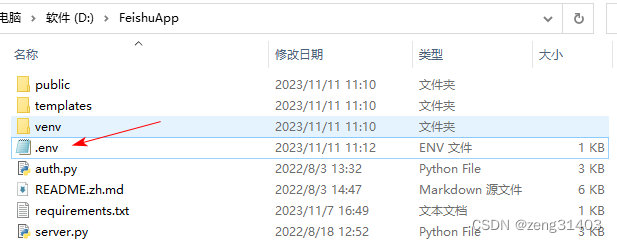
下载完毕后,整理文件夹目录:
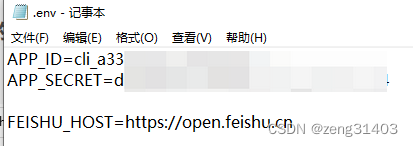
进入.env文件,修改 App ID 和 App Secret为开发者后台获取的值。
在命令行中创建虚拟环境,并启动虚拟环境:
python -m venv venv
venv\Scripts\activate
(venv) D:\FeishuApp>
二.下载示例代码
2.1 示例代码结构
示例代码结构
https://open.feishu.cn/document/home/integrating-web-apps-in-5-minutes/debug-and-release
.
├── README.zh.md     ----- 说明文档
├── public
│   ├── svg     ----- 前端图形文件
│   ├── index.css     ----- 前端展示样式
│   ├── index.js     ----- 前端交互代码
├── templates
│   ├── index.html     ----- 前端用户信息展示页面
├── auth.py     ----- 服务端获取jsapi_ticket等
├── server.py     ----- 服务端核心业务代码
├── requirements.txt     ----- 环境配置文件
└── .env     ----- 全局默认配置文件,主要存储App ID和App Secret等
2.2 下载所需的环境配置
├── requirements.txt ----- 环境配置文件
requirements.txt文件中定义了所需的环境依赖,在命令行中输入命令安装依赖:
pip install -r requirements.txt
requirements.txt的内容
Flask==2.0.2
python-dotenv
requests
pycryptodome
Werkzeug<3
2.3 安装依赖后启动服务
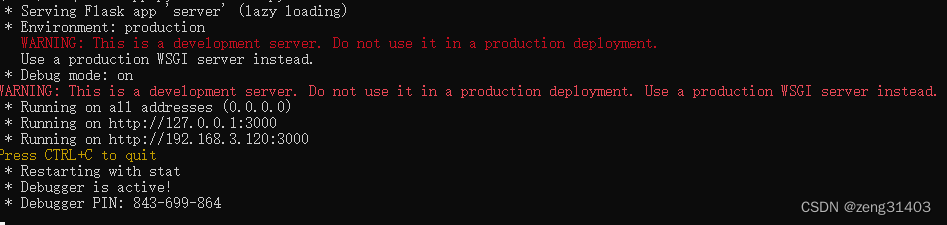
启动server.py
(venv) D:\FeishuApp>python server.py
允许防火墙通过

将服务器地址 http://192.168.3.22:3000/填入到浏览器中,现实结果如下:
内容为:
{
“message”: “index.html”
}
没有达到预期的效果。
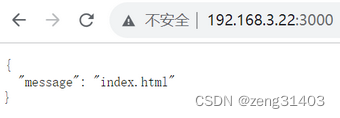
看命令行的调试结果,显示状态码为500,出现了内部服务器错误
192.168.3.22 - - [12/Nov/2023 12:47:42] "GET / HTTP/1.1" 500 -
192.168.3.22 - - [12/Nov/2023 12:47:42] "GET /favicon.ico HTTP/1.1" 500 -
2.4 Python依赖的安装
发现网页运行显示500错误以后,将该目录在cmd命令行下执行,发现是requirements.txt安装不成功。
然后在cmd命令行下再执行一次
pip install -r requirements.txt
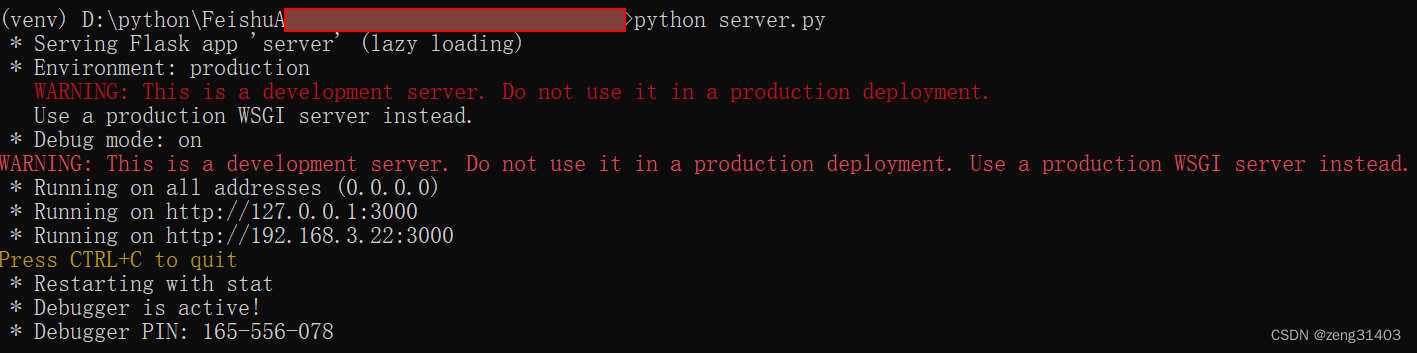
安装成功以后,再运行一次确认全部成功后,再运行server.py
(venv) D:\FeishuApp>python server.py
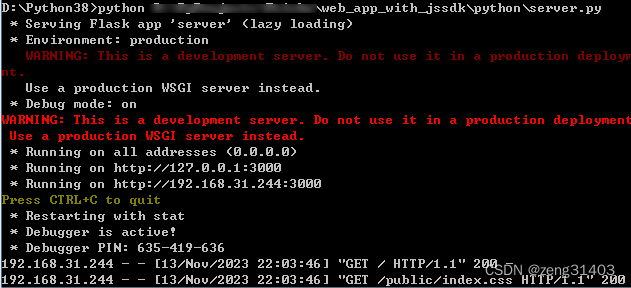
找到新的网页地址:http://192.168.31.244:3000/ 打开后先有提示:

显示网页打开成功
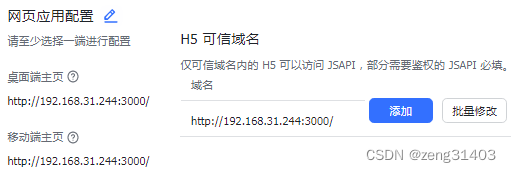
2.5 网页应用添加
在开发者后台中,添加应用能力,增加网页应用
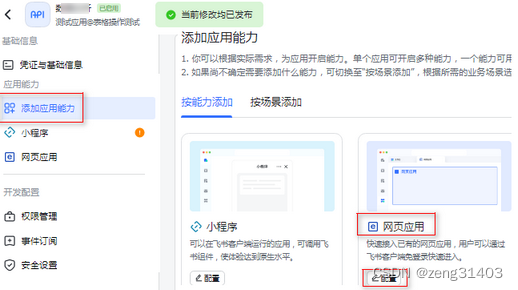
在网页应用配置中,桌面段主页和移动端主页添加上述调试主页地址
H5可信域名中添加上述调试主页地址
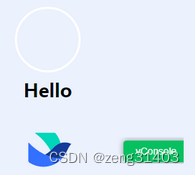
然后,打开并登录飞书,在工作台中可以看到增加的应用:
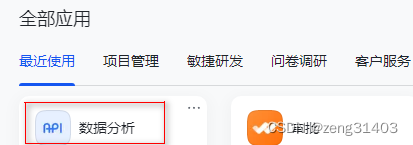
打开电脑端和手机端,都能看到这个页面:

说明网页应用示例开发成功了。
三.示例代码内容
3.1 auth.py服务端获取jsapi_ticket等
auth.py在server.py中导入,主要通过API进行鉴权,获取jsapi_ticket
authorize_tenant_access_token()利用TENANT_ACCESS_TOKEN_URI 函数,通过app_id和app_id获取tenant_access_token
get_ticket()利用JSAPI_TICKET_URI 函数,通过feishu_host和tenant_access_token获取ticket
最终,该类返回jsapi_ticket
├── auth.py ----- 服务端获取jsapi_ticket等
import requests
import logging# const
# 开放接口 URI
TENANT_ACCESS_TOKEN_URI = "/open-apis/auth/v3/tenant_access_token/internal"
JSAPI_TICKET_URI = "/open-apis/jssdk/ticket/get"class Auth(object):def __init__(self, feishu_host, app_id, app_secret):self.feishu_host = feishu_hostself.app_id = app_idself.app_secret = app_secretself.tenant_access_token = ""def get_ticket(self):# 获取jsapi_ticket,具体参考文档:https://open.feishu.cn/document/ukTMukTMukTM/uYTM5UjL2ETO14iNxkTN/h5_js_sdk/authorizationself.authorize_tenant_access_token()url = "{}{}".format(self.feishu_host, JSAPI_TICKET_URI)headers = {"Authorization": "Bearer " + self.tenant_access_token,"Content-Type": "application/json",}resp = requests.post(url=url, headers=headers)Auth._check_error_response(resp)return resp.json().get("data").get("ticket", "")def authorize_tenant_access_token(self):# 获取tenant_access_token,基于开放平台能力实现,具体参考文档:https://open.feishu.cn/document/ukTMukTMukTM/ukDNz4SO0MjL5QzM/auth-v3/auth/tenant_access_token_internalurl = "{}{}".format(self.feishu_host, TENANT_ACCESS_TOKEN_URI)req_body = {"app_id": self.app_id, "app_secret": self.app_secret}response = requests.post(url, req_body)Auth._check_error_response(response)self.tenant_access_token = response.json().get("tenant_access_token")@staticmethoddef _check_error_response(resp):# 检查响应体是否包含错误信息if resp.status_code != 200:raise resp.raise_for_status()response_dict = resp.json()code = response_dict.get("code", -1)if code != 0:logging.error(response_dict)raise FeishuException(code=code, msg=response_dict.get("msg"))class FeishuException(Exception):# 处理并展示飞书侧返回的错误码和错误信息def __init__(self, code=0, msg=None):self.code = codeself.msg = msgdef __str__(self) -> str:return "{}:{}".format(self.code, self.msg)__repr__ = __str__
3.2 server.py服务端利用Flask建立网页
server.py服务端利用Flask建立网页
1.初始化Flask,示例为app
2.先实例化auth类,获取feishu_host, app_id, app_secret,tenant_access_token和ticket
3.定义路由get_home(),渲染"index.html",渲染后执行index.js获取前端的config参数
4.config参数中,通过ticket,随机字符串,网页地址url,以及当前时间戳组合成一个字符串
5.使用sha1加密,得到签名signature
6.index.js将鉴权所需参数返回前端
7.渲染index.html
├── server.py ----- 服务端核心业务代码
#!/usr/bin/env python
# -*- coding: UTF-8 -*-
import os
import time
import hashlib
import requests
from auth import Auth
from dotenv import load_dotenv, find_dotenv
from flask import Flask, request, jsonify, render_template# const
# 随机字符串,用于签名生成加密使用
NONCE_STR = "13oEviLbrTo458A3NjrOwS70oTOXVOAm"# 从 .env 文件加载环境变量参数
load_dotenv(find_dotenv())# 初始化 flask 网页应用
app = Flask(__name__, static_url_path="/public", static_folder="./public")# 获取环境变量
APP_ID = os.getenv("APP_ID")
APP_SECRET = os.getenv("APP_SECRET")
FEISHU_HOST = os.getenv("FEISHU_HOST")# 应用出现错误时,实用flask的errorhandler装饰器实现应用错误处理
@app.errorhandler(Exception)
def auth_error_handler(ex):response = jsonify(message=str(ex))response.status_code = (ex.response.status_code if isinstance(ex, requests.HTTPError) else 500)return response# 用获取的环境变量初始化Auth类,由APP ID和APP SECRET获取access token,进而获取jsapi_ticket
auth = Auth(FEISHU_HOST, APP_ID, APP_SECRET)# 默认的主页路径
@app.route("/", methods=["GET"])
def get_home():# 打开本网页应用执行的第一个函数# 展示主页return render_template("index.html")# 获取并返回接入方前端将要调用的config接口所需的参数
@app.route("/get_config_parameters", methods=["GET"])
def get_config_parameters(): # 接入方前端传来的需要鉴权的网页urlurl = request.args.get("url")# 初始化Auth类时获取的jsapi_ticketticket = auth.get_ticket()# 当前时间戳,毫秒级timestamp = int(time.time()) * 1000# 拼接成字符串 verify_str = "jsapi_ticket={}&noncestr={}×tamp={}&url={}".format(ticket, NONCE_STR, timestamp, url)# 对字符串做sha1加密,得到签名signaturesignature = hashlib.sha1(verify_str.encode("utf-8")).hexdigest()# 将鉴权所需参数返回给前端return jsonify({"appid": APP_ID,"signature": signature,"noncestr": NONCE_STR,"timestamp": timestamp,})if __name__ == "__main__":# 以debug模式运行本网页应用# debug模式能检测服务端模块的代码变化,如果有修改会自动重启服务app.run(host="0.0.0.0", port=3000, debug=True)3.3 index.html前端用户信息展示页面
│ ├── index.html ----- 前端用户信息展示页面
<!DOCTYPE html><html lang="en"><head><meta charset="UTF-8" /><title>网页应用鉴权</title><link rel="stylesheet" href="/public/index.css" /><script src="https://cdn.staticfile.org/jquery/1.10.2/jquery.min.js"></script><!-- 引入 JSSDK --><!-- JS 文件版本在升级功能时地址会变化,如有需要(比如使用新增的 API),请重新引用「网页应用开发指南」中的JSSDK链接,确保你当前使用的JSSDK版本是最新的。--><scripttype="text/javascript"src="https://lf1-cdn-tos.bytegoofy.com/goofy/lark/op/h5-js-sdk-1.5.16.js"></script><!-- 在页面上添加VConsole方便调试--><script src="https://unpkg.com/vconsole/dist/vconsole.min.js"></script><script>var vConsole = new window.VConsole();</script></head><body><div><div class="img"><!-- 头像 --><div id="img_div" class="img_div"></div><span class="text_hello">Hello</span><!-- 名称 --><div id="hello_text_name" class="text_hello_name"></div><!-- 欢迎语 --><div id="hello_text_welcome" class="text_hello_welcome"></div></div><!-- 飞书icon --><div class="icon"><img src="../public/svg/icon.svg" /></div></div><script src="/public/index.js"></script></body>
</html>
3.4 index.css 前端展示样式
│ ├── index.css ----- 前端展示样式
* {margin: 0;padding: 0;
}body {background-color: #ebf1fd;
}.header {display: flex;flex-direction: column;background-color: white;
}.header .time-message {display: flex;height: 44px;align-items: center;padding: 0 33.5px;justify-content: space-between;
}.header .title {display: flex;align-items: center;justify-content: center;height: 44px;
}.header .title span {font-weight: 500;font-size: 17px;
}.img {width: 120px;height: 239px;position: absolute;top: 50%;left: 50%;transform: translate(-50%, -50%);display: flex;align-items: center;flex-direction: column;
}.img_div {border-radius: 50%;overflow: hidden;width: 88px;height: 88px;border: 3px white solid;display: flex;justify-content: center;align-items: center;
}.text_hello {font-size: 26px;font-weight: 600;position: absolute;top: 50%;left: 50%;transform: translate(-50%, -50%);
}.text_hello_name {font-size: 20px;color: #3370ff;position: absolute;top: 50%;left: 50%;transform: translate(-50%, 50%);text-align: center;
}.text_hello_welcome {position: absolute;bottom: 0;size: 20px;font-weight: 500;text-align: center;white-space: nowrap;
}.icon {position: absolute;bottom: 44px;left: 50%;transform: translate(-50%, 0);
}
3.5 index.js 前端交互代码
│ ├── index.js ----- 前端交互代码
1.获得当前地址url
2.调用页面/get_config_parameters发起请求,提供url作为参数
3.利用window.h5sdk.config获取鉴权参数(appId、timestamp、nonceStr、signature)
4.完成鉴权后,便可在 window.h5sdk.ready 里调用 JSAPI
5.调用 getUserInfo API 获取已登录用户的基本信息
6.单独定义的函数showUser,用于将用户信息展示在前端页面上showUser(res.userInfo);
7.定义showUser的显示代码
8.成功显示鉴权成功后用户页面
let lang = window.navigator.language;$("document").ready(apiAuth());function apiAuth() {console.log("start apiAuth");if (!window.h5sdk) {console.log("invalid h5sdk");alert("please open in feishu");return;}// 调用config接口的当前网页urlconst url = encodeURIComponent(location.href.split("#")[0]);console.log("接入方前端将需要鉴权的url发给接入方服务端,url为:", url);// 向接入方服务端发起请求,获取鉴权参数(appId、timestamp、nonceStr、signature)fetch(`/get_config_parameters?url=${url}`).then((response) =>response.json().then((res) => {console.log("接入方服务端返回给接入方前端的结果(前端调用config接口的所需参数):", res);// 通过error接口处理API验证失败后的回调window.h5sdk.error((err) => {throw ("h5sdk error:", JSON.stringify(err));});// 调用config接口进行鉴权window.h5sdk.config({appId: res.appid,timestamp: res.timestamp,nonceStr: res.noncestr,signature: res.signature,jsApiList: [],//鉴权成功回调onSuccess: (res) => {console.log(`config success: ${JSON.stringify(res)}`);},//鉴权失败回调onFail: (err) => {throw `config failed: ${JSON.stringify(err)}`;},});// 完成鉴权后,便可在 window.h5sdk.ready 里调用 JSAPIwindow.h5sdk.ready(() => {// window.h5sdk.ready回调函数在环境准备就绪时触发// 调用 getUserInfo API 获取已登录用户的基本信息,详细文档参见https://open.feishu.cn/document/uYjL24iN/ucjMx4yNyEjL3ITMtt.getUserInfo({// getUserInfo API 调用成功回调success(res) {console.log(`getUserInfo success: ${JSON.stringify(res)}`);// 单独定义的函数showUser,用于将用户信息展示在前端页面上showUser(res.userInfo);},// getUserInfo API 调用失败回调fail(err) {console.log(`getUserInfo failed:`, JSON.stringify(err));},});// 调用 showToast API 弹出全局提示框,详细文档参见https://open.feishu.cn/document/uAjLw4CM/uYjL24iN/block/api/showtoasttt.showToast({title: "鉴权成功",icon: "success",duration: 3000,success(res) {console.log("showToast 调用成功", res.errMsg);},fail(res) {console.log("showToast 调用失败", res.errMsg);},complete(res) {console.log("showToast 调用结束", res.errMsg);},});});})).catch(function (e) {console.error(e);});
}function showUser(res) {// 展示用户信息// 头像$("#img_div").html(`<img src="${res.avatarUrl}" width="100%" height=""100%/>`);// 名称$("#hello_text_name").text(lang === "zh_CN" || lang === "zh-CN"? `${res.nickName}`: `${res.i18nName.en_us}`);// 欢迎语$("#hello_text_welcome").text(lang === "zh_CN" || lang === "zh-CN" ? "欢迎使用飞书" : "welcome to Feishu");
}
至此,python快速开发网页应用全部完成,不过这只是简单的示例代码,更复杂的案例有待练习。