微网站制作工具请简述网络营销的特点
上次写RFID节点时遇到一个问题就是zigbee指令怎么接收
我用了多套方案
先说下模型
用电脑A使用c8t6为mcu,串口一接zigbee,串口2接电脑A
用电脑B使用用usb转ttl直接和电脑的串口助手通信
第一套是用输入输出重定向,直接getchar但是不对,只有前几个可以接收后面接收不到了
第二套是在中断处理函数里直接调用串口二给电脑打印
同样出现了只有前几个可以接收到后面就接收不到了。
所以我和我的搭档配合了一下,让他使用mdk5的debug模式硬件仿真,看看接收后会卡在哪里。
测试后发现卡在了中断处理函数中
while(USART_GetFlagStatus(USART1,USART_FLAG_TXE));就是这句
之前是为了判断他上次是否发送完了所以写了这个,结果就一直在while出不来了。所以我注释掉了这句话,结果非常之好使。
然后因为只有回传不行呀,又进行控制指令测试
#include "stm32f10x.h"
#include "led.h"
#include "delay.h"
#include "stdio.h"
u16 res=0;
void MyUSART1_Init(void){//PA9->TX   PA10->RX		tx是表示发送 (transport),rx是表示接收 (receive)GPIO_InitTypeDef GPIO_InitStructure;USART_InitTypeDef USART_InitSture;NVIC_InitTypeDef NVIC_InitStrue;RCC_APB2PeriphClockCmd(RCC_APB2Periph_GPIOA,ENABLE);//使能串口RCC_APB2PeriphClockCmd(RCC_APB2Periph_USART1,ENABLE);USART_DeInit(USART1);GPIO_InitStructure.GPIO_Mode =GPIO_Mode_AF_PP;//配置GPIOGPIO_InitStructure.GPIO_Pin =GPIO_Pin_9;GPIO_InitStructure.GPIO_Speed=GPIO_Speed_10MHz;GPIO_Init(GPIOA,&GPIO_InitStructure);GPIO_InitStructure.GPIO_Mode =GPIO_Mode_IN_FLOATING;GPIO_InitStructure.GPIO_Pin =GPIO_Pin_10;GPIO_InitStructure.GPIO_Speed=GPIO_Speed_10MHz;GPIO_Init(GPIOA,&GPIO_InitStructure);USART_InitSture.USART_BaudRate =115200;//配置串口USART_InitSture.USART_HardwareFlowControl =USART_HardwareFlowControl_None;USART_InitSture.USART_Mode =(USART_Mode_Rx|USART_Mode_Tx);USART_InitSture.USART_Parity =USART_Parity_No;USART_InitSture.USART_StopBits =USART_StopBits_1;USART_InitSture.USART_WordLength =USART_WordLength_8b;USART_Init(USART1,&USART_InitSture);NVIC_InitStrue.NVIC_IRQChannel =USART1_IRQn;NVIC_InitStrue.NVIC_IRQChannelCmd =ENABLE;NVIC_InitStrue.NVIC_IRQChannelPreemptionPriority =2;NVIC_InitStrue.NVIC_IRQChannelSubPriority =2;NVIC_Init(&NVIC_InitStrue);USART_ITConfig(USART1,USART_IT_RXNE,ENABLE);//开启接受中断USART_Cmd(USART1,ENABLE);}void MyUSART2_Init(void){//PA2->TX   PA3->RX		tx是表示发送 (transport),rx是表示接收 (receive)GPIO_InitTypeDef GPIO_InitStructure;USART_InitTypeDef USART_InitSture;RCC_APB2PeriphClockCmd(RCC_APB2Periph_GPIOA,ENABLE);//使能串口RCC_APB1PeriphClockCmd(RCC_APB1Periph_USART2,ENABLE);GPIO_InitStructure.GPIO_Mode =GPIO_Mode_AF_PP;//配置GPIOGPIO_InitStructure.GPIO_Pin =GPIO_Pin_2;GPIO_InitStructure.GPIO_Speed=GPIO_Speed_10MHz;GPIO_Init(GPIOA,&GPIO_InitStructure);GPIO_InitStructure.GPIO_Mode =GPIO_Mode_IN_FLOATING;GPIO_InitStructure.GPIO_Pin =GPIO_Pin_3;GPIO_InitStructure.GPIO_Speed=GPIO_Speed_10MHz;GPIO_Init(GPIOA,&GPIO_InitStructure);USART_InitSture.USART_BaudRate =115200;//配置串口USART_InitSture.USART_HardwareFlowControl =USART_HardwareFlowControl_None;USART_InitSture.USART_Mode =(USART_Mode_Rx|USART_Mode_Tx);USART_InitSture.USART_Parity =USART_Parity_No;USART_InitSture.USART_StopBits =USART_StopBits_1;USART_InitSture.USART_WordLength =USART_WordLength_8b;USART_Init(USART2,&USART_InitSture);USART_Cmd(USART2,ENABLE);}int main(void)
{	NVIC_PriorityGroupConfig(NVIC_PriorityGroup_2);MyUSART1_Init();MyUSART2_Init();delay_init();LED_Init();while (1){if(res!=0){USART_SendData(USART2,res);GPIO_ResetBits(GPIOC,GPIO_Pin_13);delay_ms(500);}else{GPIO_SetBits(GPIOC,GPIO_Pin_13);}}
}void USART1_IRQHandler(void){if(USART_GetITStatus(USART1,USART_IT_RXNE)!=RESET){USART_ClearITPendingBit(USART1,USART_IT_RXNE); //清除中断标志.res =USART_ReceiveData(USART1);USART_SendData(USART1,USART_ReceiveData(USART1));USART_SendData(USART2,USART_ReceiveData(USART1));//while(USART_GetFlagStatus(USART1,USART_FLAG_TXE));}}
结果根本控制不了。
然后使用串口助手的转16进制试了一下
发现我发了一个0他发送了三个字节
30 0D 0A
查询ASCII表发现是0\r\n的意思。
瞬间悟了这不是windows的回车么
linux的回车只有一个\n就行但是windows不是
所以我读不到控制指令也许是这个问题
/*** @brief  Checks whether the specified USART flag is set or not.* @param  USARTx: Select the USART or the UART peripheral. *   This parameter can be one of the following values:*   USART1, USART2, USART3, UART4 or UART5.* @param  USART_FLAG: specifies the flag to check.*   This parameter can be one of the following values:*     @arg USART_FLAG_CTS:  CTS Change flag (not available for UART4 and UART5)*     @arg USART_FLAG_LBD:  LIN Break detection flag*     @arg USART_FLAG_TXE:  Transmit data register empty flag*     @arg USART_FLAG_TC:   Transmission Complete flag*     @arg USART_FLAG_RXNE: Receive data register not empty flag*     @arg USART_FLAG_IDLE: Idle Line detection flag*     @arg USART_FLAG_ORE:  OverRun Error flag*     @arg USART_FLAG_NE:   Noise Error flag*     @arg USART_FLAG_FE:   Framing Error flag*     @arg USART_FLAG_PE:   Parity Error flag* @retval The new state of USART_FLAG (SET or RESET).*/
FlagStatus USART_GetFlagStatus(USART_TypeDef* USARTx, uint16_t USART_FLAG)
{FlagStatus bitstatus = RESET;/* Check the parameters */assert_param(IS_USART_ALL_PERIPH(USARTx));assert_param(IS_USART_FLAG(USART_FLAG));/* The CTS flag is not available for UART4 and UART5 */if (USART_FLAG == USART_FLAG_CTS){assert_param(IS_USART_123_PERIPH(USARTx));}  if ((USARTx->SR & USART_FLAG) != (uint16_t)RESET){bitstatus = SET;}else{bitstatus = RESET;}return bitstatus;
}
这是这个函数的源码
追一下assert_param
#ifdef  USE_FULL_ASSERT/*** @brief  The assert_param macro is used for function's parameters check.* @param  expr: If expr is false, it calls assert_failed function which reports *         the name of the source file and the source line number of the call *         that failed. If expr is true, it returns no value.* @retval None*/#define assert_param(expr) ((expr) ? (void)0 : assert_failed((uint8_t *)__FILE__, __LINE__))
/* Exported functions ------------------------------------------------------- */void assert_failed(uint8_t* file, uint32_t line);
#else#define assert_param(expr) ((void)0)
#endif /* USE_FULL_ASSERT */
就是一个检查函数参数的变量
#define IS_USART_ALL_PERIPH(PERIPH) (((PERIPH) == USART1) || \((PERIPH) == USART2) || \((PERIPH) == USART3) || \((PERIPH) == UART4) || \((PERIPH) == UART5))所有串口外设的宏
#define IS_USART_FLAG(FLAG) (((FLAG) == USART_FLAG_PE) || ((FLAG) == USART_FLAG_TXE) || \((FLAG) == USART_FLAG_TC) || ((FLAG) == USART_FLAG_RXNE) || \((FLAG) == USART_FLAG_IDLE) || ((FLAG) == USART_FLAG_LBD) || \((FLAG) == USART_FLAG_CTS) || ((FLAG) == USART_FLAG_ORE) || \((FLAG) == USART_FLAG_NE) || ((FLAG) == USART_FLAG_FE))所有串口标志的宏


CTS是通用类型系统
LIN是本地互联网络
也就是说当
USARTx->SR 和 USART_FLAG
是高电平时返回高电平是低电平时返回低电平
所以一直在循环是因为这两个一直都是高电平
但是为什么一直是高电平暂时不清楚
---------------------------------------------------------------------------------------------------------------------------------
已经三天了感觉自己好废啊,学了快三年的嵌入式和物联网串口都搞不好,被淘宝客服嘲笑
丢脸啊
算了不破不立,直接重写,遇到解决不了的bug最好的办法就是重来一次
---------------------------------------------------------------------------------------------------------------------------------
为了搞这个我又重新学了一遍32换了一个库用hal库试一试
因为标准库不好使,我用寄存器却没问题,感觉可能是设置问题
---------------------------------------------------------------------------------------------------------------------------------
终于好了,应该就是我人菜,学的太浅了,这次我大道至简,用cubemx生成俩串口,在串口中断回调里处理一点问题都木有。
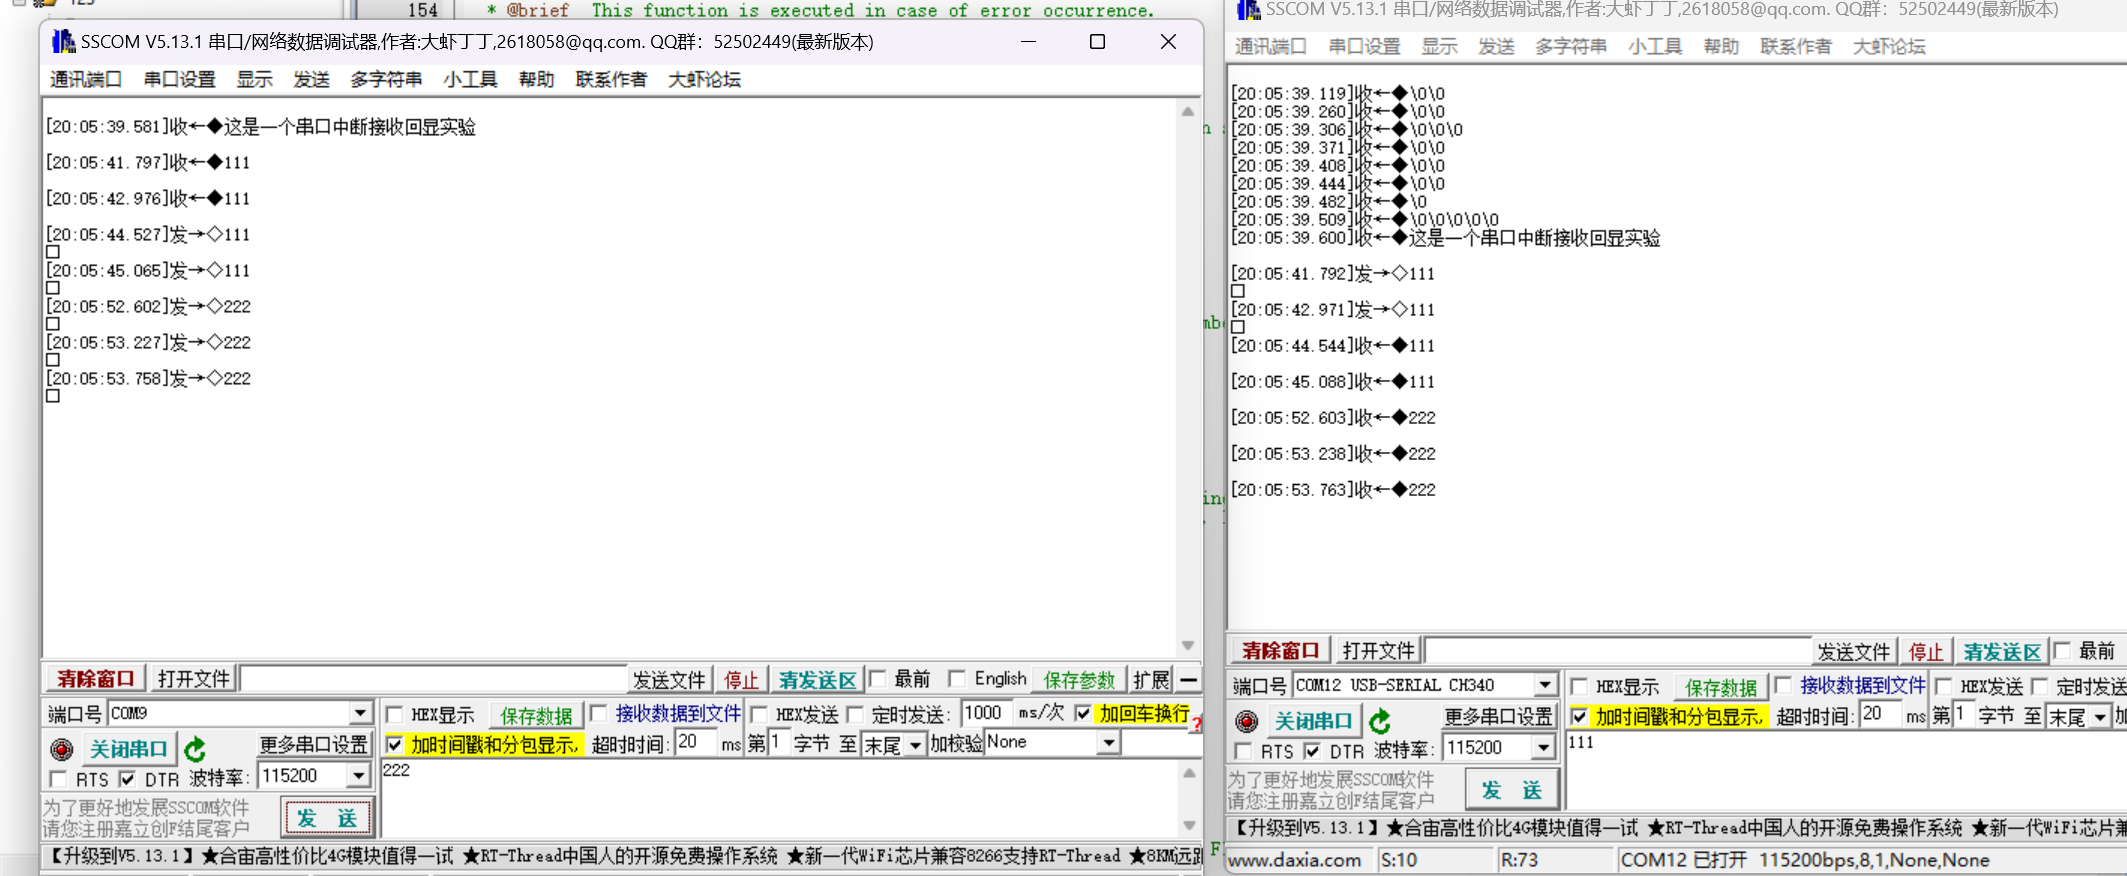
左面是单片机串口一右面是直接插在电脑上的zigbee
/* USER CODE BEGIN Header */
/********************************************************************************* @file : main.c* @brief : Main program body******************************************************************************* @attention** <h2><center>© Copyright (c) 2023 STMicroelectronics.* All rights reserved.</center></h2>** This software component is licensed by ST under BSD 3-Clause license,* the "License"; You may not use this file except in compliance with the* License. You may obtain a copy of the License at:* opensource.org/licenses/BSD-3-Clause********************************************************************************/
/* USER CODE END Header */
/* Includes ------------------------------------------------------------------*/
#include "main.h"
#include "usart.h"
#include "gpio.h"
#include <string.h>/* Private includes ----------------------------------------------------------*/
/* USER CODE BEGIN Includes *//* USER CODE END Includes *//* Private typedef -----------------------------------------------------------*/
/* USER CODE BEGIN PTD *//* USER CODE END PTD *//* Private define ------------------------------------------------------------*/
/* USER CODE BEGIN PD */
/* USER CODE END PD *//* Private macro -------------------------------------------------------------*/
/* USER CODE BEGIN PM *//* USER CODE END PM *//* Private variables ---------------------------------------------------------*//* USER CODE BEGIN PV *//* USER CODE END PV *//* Private function prototypes -----------------------------------------------*/
void SystemClock_Config(void);
/* USER CODE BEGIN PFP */
uint8_t aRxBuffer[2];
/* USER CODE END PFP *//* Private user code ---------------------------------------------------------*/
/* USER CODE BEGIN 0 *//* USER CODE END 0 *//*** @brief The application entry point.* @retval int*/
int main(void)
{/* USER CODE BEGIN 1 */uint8_t txbuf[100];/* USER CODE END 1 *//* MCU Configuration--------------------------------------------------------*//* Reset of all peripherals, Initializes the Flash interface and the Systick. */HAL_Init();/* USER CODE BEGIN Init *//* USER CODE END Init *//* Configure the system clock */SystemClock_Config();/* USER CODE BEGIN SysInit *//* USER CODE END SysInit *//* Initialize all configured peripherals */MX_GPIO_Init();MX_USART1_UART_Init();MX_USART2_UART_Init();/* USER CODE BEGIN 2 *//* USER CODE END 2 */memcpy(txbuf,"这是一个串口中断接收回显实验\n",100);HAL_UART_Transmit(&huart1,txbuf,strlen((char *)txbuf),1000);HAL_UART_Transmit(&huart2,txbuf,strlen((char *)txbuf),1000);/* Infinite loop *//* USER CODE BEGIN WHILE */while (1){/* USER CODE END WHILE *//* 使能接收,进入中断回调函数 */HAL_UART_Receive_IT(&huart1,&aRxBuffer[0],1);HAL_UART_Receive_IT(&huart2,&aRxBuffer[1],1);/* USER CODE BEGIN 3 */}/* USER CODE END 3 */
}/*** @brief System Clock Configuration* @retval None*/
void SystemClock_Config(void)
{RCC_OscInitTypeDef RCC_OscInitStruct = {0};RCC_ClkInitTypeDef RCC_ClkInitStruct = {0};/** Initializes the RCC Oscillators according to the specified parameters* in the RCC_OscInitTypeDef structure.*/RCC_OscInitStruct.OscillatorType = RCC_OSCILLATORTYPE_HSE;RCC_OscInitStruct.HSEState = RCC_HSE_ON;RCC_OscInitStruct.HSEPredivValue = RCC_HSE_PREDIV_DIV1;RCC_OscInitStruct.HSIState = RCC_HSI_ON;RCC_OscInitStruct.PLL.PLLState = RCC_PLL_ON;RCC_OscInitStruct.PLL.PLLSource = RCC_PLLSOURCE_HSE;RCC_OscInitStruct.PLL.PLLMUL = RCC_PLL_MUL9;if (HAL_RCC_OscConfig(&RCC_OscInitStruct) != HAL_OK){Error_Handler();}/** Initializes the CPU, AHB and APB buses clocks*/RCC_ClkInitStruct.ClockType = RCC_CLOCKTYPE_HCLK|RCC_CLOCKTYPE_SYSCLK|RCC_CLOCKTYPE_PCLK1|RCC_CLOCKTYPE_PCLK2;RCC_ClkInitStruct.SYSCLKSource = RCC_SYSCLKSOURCE_PLLCLK;RCC_ClkInitStruct.AHBCLKDivider = RCC_SYSCLK_DIV1;RCC_ClkInitStruct.APB1CLKDivider = RCC_HCLK_DIV2;RCC_ClkInitStruct.APB2CLKDivider = RCC_HCLK_DIV1;if (HAL_RCC_ClockConfig(&RCC_ClkInitStruct, FLASH_LATENCY_2) != HAL_OK){Error_Handler();}
}/* USER CODE BEGIN 4 *//* USER CODE END 4 *//*** @brief This function is executed in case of error occurrence.* @retval None*/
void Error_Handler(void)
{/* USER CODE BEGIN Error_Handler_Debug *//* User can add his own implementation to report the HAL error return state */__disable_irq();while (1){}/* USER CODE END Error_Handler_Debug */
}#ifdef USE_FULL_ASSERT
/*** @brief Reports the name of the source file and the source line number* where the assert_param error has occurred.* @param file: pointer to the source file name* @param line: assert_param error line source number* @retval None*/
void assert_failed(uint8_t *file, uint32_t line)
{/* USER CODE BEGIN 6 *//* User can add his own implementation to report the file name and line number,ex: printf("Wrong parameters value: file %s on line %d\r\n", file, line) *//* USER CODE END 6 */
}
#endif /* USE_FULL_ASSERT */
void HAL_UART_RxCpltCallback(UART_HandleTypeDef *UartHandle)
{if(UartHandle==&huart1){HAL_UART_Transmit(&huart2,&aRxBuffer[0],1,0);HAL_UART_Receive_IT(&huart1,&aRxBuffer[0],1);}else if(UartHandle==&huart2){HAL_UART_Transmit(&huart1,&aRxBuffer[1],1,0);HAL_UART_Receive_IT(&huart2,&aRxBuffer[1],1);}
}
/************************ (C) COPYRIGHT STMicroelectronics *****END OF FILE****/
精华都在主函数里,剩下的都是cubemx生成的